Hello friends! I’m so happy you’re here. Today, I’m sharing a special Masterclass on recipes for my 5 Best Pasta Sauces – each one more delicious than the next. If you’re ready to cook like an Italian nonna (or a French chef who cooks better than an Italian nonna – shhh, don’t tell them), then pour yourself a glass of wine, get your mise en place ready, and let’s get started.
Watch the full Masterclass video below, then dive into each sauce overview, essential tools, mistakes to avoid, and storage tips to make your pasta dinners absolutely unforgettable
Pasta Sauces Masterclass Video
1. Mac and Cheese Sauce
What Makes This Mac & Cheese Special
Ah, macaroni and cheese – the king of comfort food. But let me tell you, my friends, my version is not like any other you’ve had. Even though it may not be the first thing you think of when you think of pasta sauce, and you won’t find it on most Best Pasta Sauces lists, this Mac and Cheese is definitely made with one of the best pasta sauces you can make.
Why? Because I use four cheeses: sharp cheddar, Gruyère, Parmigiano Reggiano, and creamy brie – rind and all! Yes, rind and all because it melts beautifully. And if it didn’t, you know what I would do? I’d fix it. Because if my mac and cheese wasn’t the best I’ve ever had, I’d change it.
Most mac and cheeses are dry as bone after reheating, but mine stays creamy and luscious. It’s so good, you’ll say, “Why did I ever eat that orange powdered stuff in a box when I could have this?”
Or if you are adventurous and would like something more luxurious, try my Delicious Lobster Mac and Cheese! Two classic comfort foods, when combined, create a dish that’s truly out of this world.
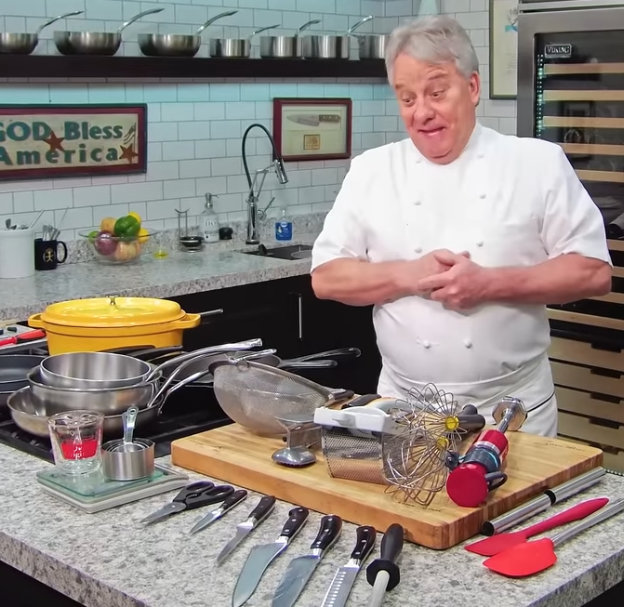
Essential Tools Needed
Microplane Nutmeg Grater – This little tool turns rock-hard nutmeg into a fragrant snowstorm that transforms your cheese sauce. Pre-ground nutmeg? Tastes like garage sawdust. Freshly grated gives you warmth and depth in seconds – worth every penny.
Reduction ‘Saucier Pan’ – A reduction saucier pan is perfect for making your mac & cheese sauce because its rounded bottom makes whisking and stirring effortless – no sauce getting stuck in corners. The wide surface area helps reduce your béchamel quickly to the right thickness without scorching. If you love making sauces, gravies, or custards, this pan will become your new best friend in the kitchen.
Lasagna Pan – Your lasagna pan isn’t just for lasagna. It’s perfect for baked mac & cheese because its high sides keep everything bubbling without spilling, and it gives you that beautiful golden-brown crust on top every time.
3 Common Mistakes to Avoid
Not making it liquid enough before baking – You’ll think it’s too watery, but after baking and pasta absorption, it becomes creamy perfection.
Using pre-shredded cheese – It’s coated with anti-caking agents that don’t melt smoothly, leaving you with grainy disappointment.
Skipping nutmeg – A small grate adds warmth and depth without screaming “Hi, I’m nutmeg!”
Recipe – Baked Macaroni & Cheese à la Jean-Pierre
Servings
Makes: 12 servings
Pan Size: Large lasagna pan, approximately 8” (20cm) x 12” (30cm)
Ingredients
For the Cheese Sauce (Mornay Sauce)
4 ounces sweet butter
4 ounces flour
6 ½ cups scalded milk
¼ teaspoon ground nutmeg
4 ounces grated Reggiano parmesan cheese
4 ounces grated Gruyère cheese
4 ounces grated cheddar cheese
4 ounces triple cream brie cheese (yes, with the rind – don’t panic, it melts!)
Cheese grater (please, no pre-shredded cheese here!)
Large lasagna pan
Oven
Preparation Steps
2. Make the Roux
1. Get Ready
Preheat your oven to 375°F (190°C). You want it hot and ready like your date for prom night.
Heat the butter in a large sauce pan over medium heat. Watch it melt lovingly like your heart when someone says “Dinner’s ready.”
Add the flour and mix it in with a wooden or silicone spoon. Cook for a couple of minutes until it turns light golden brown. Don’t rush this step – it’s what removes that raw flour taste. We want creamy cheese sauce, not glue.
3. Make the Mornay Sauce
Add the scalded milk slowly while whisking vigorously. Think of it like you’re whisking away your worries – no lumps allowed.
Add the ground nutmeg. Just a touch – it’s like perfume. Enough to smell it, not enough to knock people out.
Add all the cheeses:
Parmesan
Gruyère
Cheddar
Brie (rind included, because it melts into glorious creaminess)
Reduce heat to very low. Let it cook gently for 10-15 minutes, stirring occasionally until it’s smooth, creamy, and makes you say “Mamma mia, that’s beautiful!”
4. Combine Pasta and Sauce
Mix the cooked elbow pasta into the cheese sauce. Stir well so every little elbow is hugged in creamy goodness.
5. Assemble the Mac & Cheese
Butter the inside of your lasagna pan. Don’t skip this or you’ll need a jackhammer to serve it later.
Pour in the macaroni and cheese mixture.
Top with the bread crumb mixture (breadcrumbs, parmesan, sun-dried tomatoes, parsley). This will form that gorgeous golden crunchy top that makes people fight over corner pieces.
6. Bake
Bake at 375°F until golden brown and bubbling. No exact time here – just watch it like it’s your favorite show on Netflix. When it’s golden brown, it’s ready.
Chef Jean-Pierre’s Final Tips
Don’t be afraid of the brie rind. It melts beautifully and gives the sauce a silkiness you can’t achieve with cheddar alone.
Make it extra liquid before baking. If you think it’s too runny, perfect – the pasta will absorb it and remain creamy, not dry.
Taste before baking. Add salt and pepper as needed so your mac and cheese sings with flavor, not blandness.
Et voilà, my friends. Serve hot, with a crisp salad if you’re feeling virtuous or a glass of Chardonnay if you’re feeling French.
Storage and Reheating Best Practices
Refrigerator: Store covered up to 4 days.
Freezer: Freeze in airtight containers up to 2 months. Thaw in fridge overnight.
Reheating: Microwave gently with a splash of milk or reheat covered in oven at 325°F until warmed through.
FAQs
Why does Chef Jean-Pierre’s mac and cheese stay creamy even after reheating?
Because I make it overly liquid before baking. You’re probably thinking, “This is soup, not sauce!” Trust me, after baking and the pasta absorbing the liquid, you get a luscious, creamy result that reheats without becoming dry as dust.
Can I substitute any of the cheeses in this recipe?
Absolutely. If you don’t like brie – first, what’s wrong with you? – but yes, you can replace it with gouda, fontina, or anything creamy that melts well. Just avoid pre-shredded bag cheese because it has anti-caking agents that don’t melt properly.
Why do you recommend using freshly grated nutmeg?
Because pre-ground nutmeg tastes like sawdust that’s been sitting in your grandmother’s spice rack since 1952. Fresh nutmeg gives a delicate warmth that enhances cheese sauces without announcing itself like, “Hello, I’m nutmeg, and I’ve ruined your mac and cheese.”
2. Bolognese Sauce
Why This Bolognese Special
Bolognese – the sauce that starts internet wars over “authenticity.” This sauce was a shoo-in for the Best Pasta Sauces Top 5 list.
My Bolognese combines ground beef with spicy Italian sausage for extra fat, flavor, and complexity. Unlike traditional beef/pork/veal mixes, mine uses sausage for both flavor and known fat content. As I always say, “You don’t know what fat they use in store-bought 80/20 ground beef. I prefer to know my fat is coming from delicious Italian sausage.”
And no two of my Bolognese recipes are ever the same because who wants to eat the same thing every time? Life is too short for boring food, my friends. Even if you are not a vegetarian, you need to try my Hearty Vegetable Bolognese, it’s amazing!
Essential Tools Needed
Heavy Dutch Oven or Braiser – A heavy Dutch oven or Braiser is essential for long, gentle simmering that marries all those beautiful flavors together. Its thick bottom prevents scorching so your sauce doesn’t burn while it bubbles away for hours. Plus, it retains heat evenly, keeping your Bolognese at the perfect simmer without constant babysitting. If you don’t have one yet, my friends, it’s worth the investment – this pot will outlive all of us.
Bamboo Spatula – Your Bamboo Spatula chopper / spatula breaks ground meat into small pieces for even browning and that magical Maillard reaction. No one wants big clumps of meat floating in their sauce like meatball meteors. It helps you press and stir at the same time, getting every piece beautifully caramelized. Trust me, my friends, browned meat equals flavor – and flavor is everything
Medium Ribbon Grater – A medium ribbon grater finely shreds carrots into the sofrito so they melt seamlessly into your sauce. Nobody wants chunky carrot bits in their bolognese – this ensures sweetness without texture. It grates efficiently with minimal effort, saving your knuckles from battle wounds. And yes, it works wonders for cheese and nutmeg too – a multitasking kitchen hero.
3 Common Mistakes to Avoid
Not browning your meat properly – Browning creates deep, rich flavors. Steaming or poaching ground meat is a culinary crime.
Skipping the milk addition – Milk binds flavors and reduces acidity, creating a velvety finish.
Using only lean ground beef without extra fat – Fat = flavor. The sausage brings both.
Recipe – Authentic Italian Bolognese à la Jean-Pierre
Servings
Makes: about 6 servings (depending on how hungry you are… or if you’re feeding Jack).
Ingredients
For the Meat Sauce
3 tablespoons garlic or plain olive oil (45 mL)
1 pound (90/10 or 80/20) ground beef (preferably chuck)
1 pound spicy Italian sausage, casing removed
1 large onion, finely chopped
2 stalks celery, finely diced
2 medium carrots, shredded
2 tablespoons tomato paste
1 tablespoon chopped garlic
10 ounces red wine (Chianti Classico is wonderful)
2 cans (28 ounces each) peeled and crushed tomatoes
24 ounces beef broth
½ cup chopped basil leaves
½ cup whole milk
Salt & freshly ground black pepper, to taste
For the Pasta
1 pound orecchiette pasta, cooked according to package directions
For Serving
Grated Parmesan cheese
Tools You’ll Need
Large sauté pan
Large Dutch oven or heavy-bottomed pot
Wooden spoon or meat chopper
Cheese grater
Patience (it’s a bolognese, not a 10-minute TikTok pasta!)
Preparation Steps
1. Brown the Meats
In a large sauté pan, heat 2 tablespoons of olive oil over medium-high heat.
When the oil is hot, add the ground beef and Italian sausage.
Cook until beautifully browned, breaking up the meat and sausage with a wooden spoon or meat chopper. You want small crumbles, not meatballs – think ragu, not burger patty.
2. Start the Sofrito Base
In a large Dutch oven or heavy-bottomed pot, heat 1 tablespoon of olive oil over medium heat.
Add the finely chopped onion and cook until it turns light golden brown and smells like heaven in an Italian grandmother’s kitchen.
Stir in the shredded carrots and diced celery. Cook for a few minutes until they soften.
3. Build the Flavor
Add the tomato paste and cook it briefly, letting it caramelize just a touch. This wakes up its natural sweetness – don’t skip it, my friends!
Add the chopped garlic and sauté just until fragrant. Don’t let it burn – garlic is like your mother-in-law: wonderful in small amounts, overpowering when scorched.
4. Deglaze and Combine
Pour in the red wine and let it reduce for a couple of minutes. This cooks off the alcohol and leaves the rich, deep flavor behind.
Add the peeled and crushed tomatoes, then stir in the browned meat mixture from your sauté pan.
Pour in the beef broth and give everything a loving stir.
5. Simmer Low and Slow
Bring to a gentle simmer and cook uncovered for about an hour, stirring occasionally.
After an hour, add the whole milk. Stir to incorporate and continue simmering for another 30-45 minutes. The milk binds all the flavors together, making your sauce creamy and balanced.
Check consistency regularly. If it gets too thick, add more broth to keep it moist and luscious.
6. Final Seasoning
Taste and season generously with salt and freshly ground black pepper. Remember, under-seasoned sauce is like a party with no music – bland and disappointing.
7. Serve
Toss the cooked orecchiette pasta with your glorious bolognese sauce.
Top with a generous shower of grated Parmesan cheese.
Chef Jean-Pierre’s Final Tips
If you want extra depth, use homemade beef stock instead of boxed broth.
Always cook bolognese long enough for flavors to meld – this isn’t a sprint, it’s a marathon of deliciousness.
This sauce freezes beautifully for up to 17 years. Okay, maybe not 17 – but at least 3 months for sure.
Et voilà, my friends! You now have an authentic Italian Bolognese that will make your family and guests say “Mamma mia, this is amazing!”
Storage and Reheating Best Practices
Refrigerator: Store in airtight containers up to 5 days.
Freezer: Freeze up to 6 months. Portion for easy thawing.
Reheating: Thaw overnight in fridge. Reheat gently on stovetop, adding beef stock or milk if needed.
FAQs
Why do you use spicy Italian sausage in your bolognese?
Because it adds both fat and flavor complexity. You don’t know what mystery fat is in that grocery store 80/20 beef, but you do know the delicious fat in Italian sausage. Plus, the spice gives a gentle kick that makes your guests say, “Hmm, what’s in here?”
Can I freeze the bolognese sauce?
My friends, it will freeze beautifully for “17 years,” as I like to say – but realistically, a good 3–6 months in an airtight container. Make a big batch, divide it into smaller containers, and you’ll have dinner ready faster than you can say “Mama mia.”
Why do you add milk to bolognese?
Milk binds the flavors together and softens the acidity of the tomatoes. Traditional Italian bolognese always includes milk near the end for a velvety finish. As my mother would say, “It marries everything together like a happy Italian wedding.”
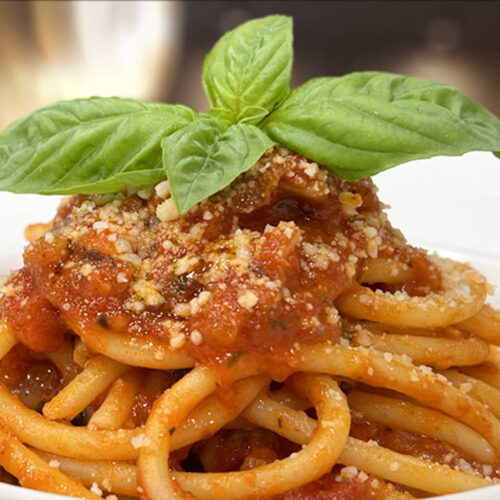
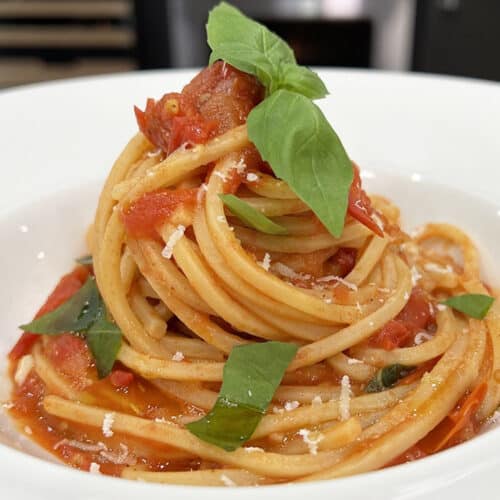
3. Pomodoro Sauce
Why This Pomodoro is Different
Ah, Pomodoro – the simplest, freshest tomato sauce that’s so good it feels like cheating. You can’t compile a Top 5 Best Pasta Sauces List without Pomodoro Sauce.
My friends, this recipe is so easy I almost didn’t make a video. Fresh cherry or Campari tomatoes, a little garlic, onion (yes, onion – I’m half French, I can’t help myself), and fresh basil. That’s it. The secret? Getting the best tomatoes you can find, not those tasteless red water balloons they call tomatoes at most supermarkets.
Essential Tools Needed
Tomato Smasher or Potato Masher – A tomato smasher or potato masher lets you crush those tomatoes by hand, making you feel like an Italian nonna in the countryside. It breaks them down gently without pureeing them into baby food, keeping the sauce rustic and textured. Plus, it’s faster and easier to clean than pulling out a blender for a small job.
Microplane Zester – Your Microplane zester is perfect for adding lemon zest to brighten your Pomodoro and for shaving garlic paper-thin so it melts into the sauce without chunks. The fine blades create a delicate zest that distributes evenly, avoiding bitter pith.
High-Quality Chef’s Knife – A high-quality chef’s knife is essential for prepping Pomodoro because it lets you chop tomatoes, onions, and garlic quickly and precisely without smashing them into a watery mess. Clean cuts mean your tomatoes stay juicy and vibrant, not bruised and oxidized. And remember, my friends – a sharp knife is safer than a dull one that slips and gives you an unwanted souvenir.
3 Common Mistakes to Avoid
Using flavorless tomatoes – Bad tomatoes equal bad Pomodoro. Invest in ripe cherry or vine tomatoes.
Overcooking the sauce – Pomodoro should be bright and fresh, not cooked down into tomato paste.
Not smashing the tomatoes enough – Breaking them releases pectin for natural thickening and better texture.
Recipe – Pomodoro Sauce à la Jean-Pierre
Servings
Makes: 2 generous servings (Or one serving if you’re like Jack after a long filming day.)
Ingredients
For the Pasta
½ pound spaghetti, linguine, or fettuccine
For the Sauce
2 tablespoons extra virgin olive oil (Chef used basil-infused olive oil – it’s like regular olive oil, but it sings Italian opera in your pan)
⅓ cup diced onion
2 pounds (approx.) cherry or Campari tomatoes, cut in halves or quarters depending on size
1 teaspoon finely chopped garlic
Salt & pepper to taste
About ½ cup fresh basil leaves (keep the stems if you have them)
For Serving
About ¼ cup grated Parmesan cheese
Tools You’ll Need
Large pot for boiling pasta
Saucepan for making the sauce
Potato masher (your new tomato smasher!)
Wooden spoon
Chef’s knife
Preparation Steps
1. Cook the Pasta
Bring a large pot of salted water to a boil.
Cook your pasta according to the manufacturer’s instructions until al dente. Don’t overcook it, my friends – mushy pasta makes Italian grandmothers weep.
2. Start the Sauce Base
While the pasta cooks, heat the olive oil in a saucepan over medium heat.
When the oil is hot, add the diced onion.
Cook for a few minutes until the onion becomes light golden brown and smells like an Italian street market at noon.
3. Build the Pomodoro Flavor
Add the finely chopped garlic to the onions. Stir and cook just until fragrant. If you burn the garlic, throw it out and start again. Burned garlic tastes like regret.
Add the tomatoes and about ¾ of the basil leaves and their stems (if you’ve got them). The stems have flavor too – don’t let them feel left out.
Season lightly with salt and pepper.
Reduce heat to medium-low and cook gently for 10-15 minutes, stirring occasionally. You’ll start to smell Italy in your kitchen. That’s when you know you’re on the right track.
4. Mash and Finish the Sauce
Use a potato masher to mash the tomatoes right in the pan. You’re not making puree – just breaking them down so they coat your pasta beautifully.
Remove the basil stems if you used them.
Add the remaining fresh basil leaves for a burst of bright flavor at the end.
Taste and adjust seasoning with more salt and pepper, if needed.
5. Combine Pasta and Sauce
Drain your cooked pasta and place it directly on top of the sauce in the pan.
Sprinkle with grated Parmesan cheese.
Toss everything together until each strand is coated in that fresh, simple, delicious pomodoro sauce.
Chef Jean-Pierre’s Final Tips
Good tomatoes are everything. If your tomatoes taste like water, your sauce will taste like water.
Don’t skip fresh basil. It’s the soul of this sauce.
Serve immediately with extra Parmesan at the table – because too much cheese is never a problem.
Buon appetito, my friends!
Storage and Reheating Best Practices
Refrigerator: Store in airtight containers up to 3 days.
Freezer: Freeze up to 2 months, though best enjoyed fresh.
Reheating: Gently reheat on stovetop, adding a splash of pasta water to revive freshness.
FAQs
Why does Chef Jean-Pierre add onions to his pomodoro when Italians often don’t?
Because I’m French-Italian and onions add subtle sweetness and depth to balance the acidity of fresh tomatoes. Don’t like onions? Leave them out. Your kitchen, your rules. Just don’t tell Nonna.
What’s the secret to a great pomodoro sauce?
Good tomatoes. That’s it. No tomato = no pomodoro. If you use tasteless grocery store tomatoes, your sauce will taste like hot water. Buy ripe, vine or Campari tomatoes, and your pomodoro will sing like Pavarotti.
Can I blend the pomodoro sauce to make it smooth?
You can, but remember: texture is a conductor of flavor. Leaving it slightly chunky gives better mouthfeel and keeps the flavor bright. But if you prefer it silky, blend away and call it your own masterpiece.
4. Creamy Mushroom Pasta Sauce
Why This Creamy Mushroom Sauce is Different
Cream, mushrooms, tarragon, and pasta – what’s not to love? My creamy mushroom sauce uses shiitake, baby portobello, and regular mushrooms for layered earthy flavors. The secret? Cooking out all the water so the mushrooms taste rich instead of spongy. A touch of tarragon adds elegance, and a splash of cream brings it all together in under 20 minutes.
Essential Tools Needed
Large Pot – A large pot for boiling pasta is essential so your pasta cooks evenly and doesn’t clump into a sticky mass. Pasta needs plenty of salty water to move freely and release excess starch. Crowding it in a small pot makes it gummy and sad, like overcooked cafeteria noodles. Treat your pasta right, and it’ll thank you by holding onto that gorgeous creamy mushroom sauce perfectly.
Silicone Spatulas– Silicone spatulas are perfect for stirring your creamy mushroom sauce because they glide along the pan without scratching it and scrape every last bit of goodness from the sides. They’re heat-resistant, so you won’t melt them into your dinner – trust me, plastic doesn’t taste great. Plus, they’re flexible enough to fold in your cream and cheese gently without breaking the delicate mushrooms. They’re a true kitchen workhorse you’ll use for sauces, baking, and everything in between.
Strainer – A good strainer ensures you drain your pasta quickly without losing any down the sink when you’re in a rush to combine it with the sauce. It also lets you rinse mushrooms if needed, keeping grit out of your dish. Choose one with sturdy handles so it doesn’t flip into the pot mid-pour – no one wants a pasta waterfall on the counter. And remember, a fine mesh strainer doubles for rinsing herbs or sifting flour when you bake.
Porcini Mushroom Salt – Porcini mushroom salt is a secret ingredient that elevates your creamy mushroom sauce to restaurant-level flavor. It adds a deep, earthy umami that intensifies the mushrooms’ natural taste without overpowering the cream. Just a sprinkle brings complexity and makes your guests wonder what your secret is. If you’ve never used it, friends, prepare to fall in love.
3 Common Mistakes to Avoid
Not cooking out mushroom water – Waterlogged mushrooms taste like soggy sponges, not earthy umami bombs.
Using light cream instead of heavy cream – Light cream will curdle under heat. Heavy cream thickens into silky perfection.
Adding cream too early – Add cream only after mushrooms are browned and liquid reduced to avoid thinning out the sauce.
Recipe – Creamy Mushroom Pasta à la Jean-Pierre
Servings
Makes: 2 servings (or one giant serving if you’re very, very hungry — I won’t judge)
Ingredients
For the Pasta
8 to 10 ounces penne (or your favorite pasta shape)
For the Sauce
2 ounces butter
½ cup finely diced red onion
4 to 6 ounces sliced mixed mushrooms
2 teaspoons chopped garlic
2 teaspoons freshly chopped tarragon (or sage, or thyme and rosemary — pick your favorite!)
1 tablespoon chopped parsley
2 to 3 ounces beef stock (optional, but delicious)
¼ cup chicken stock
2 cups chopped spinach leaves
6 ounces heavy whipping cream (no light cream — trust me)
1 cup grated Parmesan (or a mix of Parmesan and Pecorino Romano if you’re feeling fancy)
For Seasoning
Salt and freshly ground black pepper, to taste
Tools You’ll Need
Large sauté pan
Wooden spoon
Cheese grater
Large pot for boiling pasta
Strainer
Preparation Steps
1. Cook the Pasta
Bring a big pot of salted water to a boil.
Cook the penne (or your pasta of choice) until al dente, according to the package instructions.
Drain and set aside. Keep a splash of that pasta water — you never know when you might need it to loosen the sauce!
2. Start the Sauce Base
In a large sauté pan, melt the butter over medium heat.
Add the diced red onion and cook for about 5 minutes until it softens and smells wonderful.
3. Cook the Mushrooms
Add the sliced mushrooms to the pan.
Season with a little salt and pepper, then sauté until the mushrooms have given up all their water. Don’t rush this — soggy mushrooms are the enemy of good sauce!
4. Build the Flavor
Add the chopped garlic and your choice of fresh herbs (tarragon, sage, thyme, rosemary — they’re all good friends of mushrooms).
Pour in the beef stock (if using) and the chicken stock.
Let everything bubble and reduce for about a minute to concentrate all that goodness.
5. Wilt the Spinach
Stir in the chopped spinach leaves.
Cook just until the spinach wilts down nicely.
6. Make it Creamy
Pour in the heavy whipping cream — none of that “light cream” business here.
Let it simmer gently until the sauce thickens to the perfect consistency. It should coat the back of a spoon — or your pasta, which is even better!
7. Finish and Serve
Stir in the grated cheese until it melts through the sauce.
Taste and adjust seasoning with freshly ground black pepper (and more salt if needed).
Add the cooked pasta right into the pan. Toss it all together until every piece is hugged with creamy mushroom sauce.
Chef Jean-Pierre’s Pro Tips
If the sauce gets too thick, loosen it with a splash of that reserved pasta water. Magic!
Use good-quality mushrooms for the best flavor — a mix of shiitake, cremini, and even a few wild mushrooms if you’ve got them.
Always grate your own cheese. Pre-grated? Non, non, non!
Et voilà, my friends — you’ve got yourself a silky, rich, restaurant-worthy Creamy Mushroom Pasta you’ll want to make again and again.
Storage and Reheating Best Practices
Refrigerator: Store up to 3 days in airtight containers.
Freezer: Not recommended as cream sauces separate when thawed.
Reheating: Gently reheat on stovetop with a splash of cream to restore texture.
FAQs
Why is it important to cook out all the water from mushrooms?
Because mushrooms are like sponges. If you don’t cook out the water, they taste rubbery and bland. Get rid of the water, and you get concentrated, earthy mushroom flavor that hugs your pasta like a warm French hug (they exist).
Can I use light cream instead of heavy cream in this recipe?
No. Light cream will break when boiled and leave you with a curdled mess that looks like your culinary dreams just shattered. Use heavy cream with at least 36% fat to ensure it thickens beautifully without splitting.
What other vegetables or proteins can I add to creamy mushroom pasta?
Oh, my friends, anything you want: sun-dried tomatoes, grilled chicken, shrimp, or even roasted butternut squash. Just remember to adjust the seasoning to balance the additions and maintain that luxurious creamy texture.
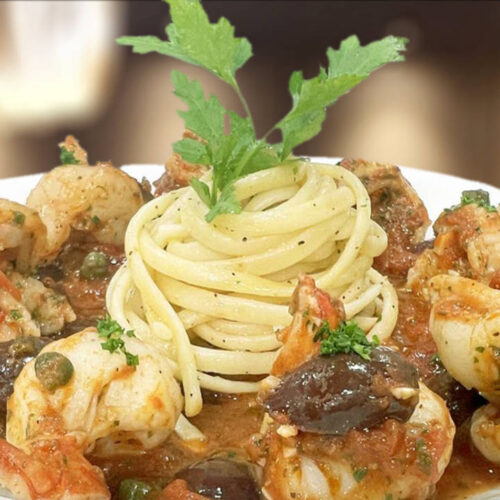
5. Linguini with Clam Sauce
Why This Linguini with Clam Sauce is Different
Italian food at its purest – only three main ingredients and a world of flavor. Fresh clams poached in garlic olive oil and white wine create a natural clam liquor that no bottled clam juice can match. Light, briny, and kissed with lemon zest, this dish proves you don’t need complicated sauces to create a masterpiece.
Essential Tools Needed
Tongs – Your trusty tongs make handling hot clams easy and safe without burning your fingers or squishing their delicate meat. They’re perfect for pulling clams out of the pot as soon as they open so they don’t overcook and turn rubbery. Plus, you’ll use them to toss the pasta and sauce together with confidence and control. They’re like an extension of your hand – every chef’s secret weapon.
Fine Mesh Strainer or Chinois – A fine mesh strainer or chinois is crucial when making clam sauce because it catches every tiny piece of grit or shell that might ruin your silky sauce. Nobody wants to bite down on sand when enjoying beautiful clams. The chinois’ ultra-fine mesh filters out even the smallest particles, giving you clear, pure clam juice. Trust me, friends, once you strain it properly, you’ll never go back to bottled clam juice again.
Ladle – A ladle is essential for scooping out that precious clam juice without disturbing any sand that might have settled at the bottom. It lets you transfer the liquid gently into your skillet without pouring too fast and clouding it with grit. You’ll also use it to add pasta water for emulsifying the sauce to that perfect creamy consistency. Without a ladle, friends, your kitchen life just isn’t complete.
3 Common Mistakes to Avoid
Using canned clams instead of fresh – Fresh clams yield sweet, tender bites and real clam liquor. Canned clams taste like metal.
Not purging clams of sand properly – There’s nothing like crunching down on sand to ruin dinner. Soak clams in saltwater with cornmeal for a few hours to purge them.
Overcooking the clams – Clams should open just enough to remain tender. Overcooked clams become chewy rubber bands.
1 handful parsley stems (save the leaves for later)
3 cups white wine (Sauvignon Blanc or Pinot Grigio)
A pinch of chili flakes
For the Pasta
6 ounces linguine
2 tablespoons garlic-infused or regular olive oil
1 clove garlic, sliced razor-thin
8 ounces reserved clam juice
1 tablespoon fresh parsley, chopped
Zest of half a lemon (optional, but it gives a zesty little kick)
A pinch of chili flakes
Pasta water (as needed to create a creamy emulsion)
Black pepper, to taste
Tools You’ll Need
Large pot for soaking and cooking clams
Large skillet
Fine mesh strainer or chinois
Tongs
Ladle
Chef’s knife
Preparation Steps
1. Prep the Clams – Their Spa Day
Place the fresh littleneck clams in a large bowl with salted water for two hours. Think of it as their spa day before they sacrifice themselves for your dinner.
Optional: Grandma used to add cornmeal to help them spit out sand. Chef says he’s tried it both ways – your call.
Check for duds:
Toss any cracked ones.
If one’s open, give it a tickle and a squeeze. If it doesn’t snap shut, it’s a goner.
2. Cook the Clams & Make Liquid Gold
In a large pot, heat 2 tablespoons garlic olive oil over medium heat.
Add 3 smashed garlic cloves and parsley stems. Let them sizzle just until fragrant – don’t let that garlic burn, or you’ll regret it!
Add the clams to the pot.
Pour in 3 cups of white wine and sprinkle a pinch of chili flakes.
Increase the heat to bring it to a boil, letting some of the alcohol cook off.
Cover with a lid and steam until the clams just pop open.
As they open, remove them with tongs to avoid overcooking.
Set the cooked clams aside, saving some pretty shells for plating.
Any clams that don’t open after a fair chance go straight to the trash – no exceptions.
3. Strain the Clam Juice
Carefully pour the remaining pot contents through a fine mesh strainer or chinois into a bowl.
Sand is the enemy here. Run a ladle along the bottom of the pot to check for grit. If you spot any, strain it again – twice if needed.
Trust me, friends, this fresh clam juice beats anything jarred by a mile.
4. Cook the Pasta
Bring a large pot of salted water (salty like the sea) to a boil.
Cook the linguine to about 95% done – it should still have a nice bite.
Chef’s tip: For dinner parties, he cooks pasta ahead, drains it, tosses with a drizzle of olive oil so it doesn’t stick, and reheats it later in the same water.
5. Make the Clam Sauce
In a large skillet, heat 2 tablespoons garlic-infused olive oil over medium heat.
Add one clove of razor-thin sliced garlic and sizzle just until light golden – not brown – or it’ll turn bitter and ruin your day.
Add a pinch of chili flakes.
Pour in 8 ounces of your reserved clam juice.
Add 2 dozen cooked clams, shells and all, just to warm them up. They’re already cooked – no funny business here.
6. Combine Pasta and Sauce
Toss in the pre-cooked linguine.
Add a big splash of pasta water to help emulsify the sauce. Don’t be shy – that starchy pasta water is your secret weapon!
Mix it all together like you’re dancing with it, until the oil, clam juice, and pasta water come together into a silky, dreamy sauce. Pure Italian genius – no cream needed!
7. Finish and Serve
Plate the pasta, arranging a few clams in their shells around the edge for presentation.
Drizzle a little extra clam juice on top.
Sprinkle with fresh chopped parsley, a touch of black pepper, and lemon zest if you want that bright, fresh kick.
And friends, remember – no cheese on this one. Trust me, if you add cheese, every Italian grandma will come after you with a wooden spoon!
Et voilà, my friends – you’ve made an Italian Clam Sauce worthy of any seaside trattoria. Simple, elegant, and pure magic in every bite.
Storage and Reheating Best Practices
Refrigerator: Store sauce up to 2 days. Do not store cooked clams for long; they toughen quickly.
Freezer: Not recommended; clams become rubbery.
Reheating: Gently reheat sauce on stovetop; add fresh clams if desired when serving leftover sauce with pasta.
FAQs
Can I use canned clams instead of fresh clams?
Of course… if you want it to taste like aluminum. Fresh clams give you sweet, tender bites and natural clam liquor that’s liquid gold. But if canned is your only option, rinse them well and use good-quality bottled clam juice to build flavor.
Why shouldn’t I put Parmesan cheese on clam pasta?
Because Italians will throw you out of the kitchen window. Seafood pasta traditionally has no cheese to keep the pure ocean flavor. But if you’re feeling rebellious and no Italian grandmothers are watching, go ahead… just don’t blame me.
How do I make sure there’s no sand in my clams?
Soak them in cold saltwater with a little cornmeal for a few hours to purge the sand. Then rinse and scrub well. And strain your final sauce through a fine mesh sieve or cheesecloth so you don’t end up crunching down on sand mid-twirl. Sand does not belong in al dente.
Final Conclusion
My friends, these are my five best pasta sauce recipes to make your pasta nights unforgettable. Remember, the secret to great pasta is simple: great ingredients, care, and a little Chef Jean-Pierre love. Taste, adjust, and have fun – because cooking is about creating joy for yourself and everyone you feed.
If you enjoyed this Masterclass, subscribe for more and explore my upcoming series on the best beef, pork, and seafood recipes. Until then – bon appétit, and I’ll see you in the kitchen!
Chef Jean-Pierre, born in Aix-en-Provence, France, honed his culinary skills at a young age, mastering the art of charcuterie by the age of twelve. Determined to become a chef, he began his formal apprenticeship at L'Oustau de Baumaniere in Provence, one of the world’s best restaurants with a 3-star Michelin rating.
Jean-Pierre continued his apprenticeship on the French Riviera where he worked at famous restaurants, such as L’Oasis at La Napoule, Le Vendome in Aix-en-Provence, and the the Carlton in Cannes. In 1976, he opened The Left Bank Restaurant, consistently recognized as one of the best in America for 22 years by magazines like "Bon Appetit," "Conde Nast," "Gourmet Magazine" and "Travel & Leisure."
Jean-Pierre was also a popular TV personality, having hosted National Public Television series like "Incredible Cuisine” and "Sunshine Cuisine." He was also nominated for "Best Culinary Video" by the James Beard Foundation and operated the nationally renowned “Chef Jean-Pierre's Cooking School” and was a sought-after guest on shows like "The Today Show" and "Larry King Live."
With over 2 Million Subscribers to his Chef Jean-Pierre YouTube Channel, he is a widely respected figure in the culinary world, known for his skill and dedication to his craft, but even more so known for making gourmet cooking fun and easy to learn.
Thanks for these sauce recipes! Mac and Cheese super.
Enjoy your time away. We will miss you and look forward to your return. Let Jack know that we are counting on him to fill the vacancy until your sabbatical is over!
5-inch high-carbon German Stainless Steel blade will effortlessly slice through your steak, bread, vegetables, and fruits. The handle is ergonomically designed Pakka Wood. Makes a perfect gift presented in a beautifully crafted wooden box.


Love watching you & Jack for the great filming, you are such fun to watch. I look for your videos everyday., you are such fun. Take care.
Thanks for these sauce recipes! Mac and Cheese super.
Enjoy your time away. We will miss you and look forward to your return. Let Jack know that we are counting on him to fill the vacancy until your sabbatical is over!
You have yet to develop a recipe that let me down! Viva la Chef Jean Pierre